
Pre-scriptum (dated 26 June 2020): the material in this post remains interesting but is, strictly speaking, not a prerequisite to understand quantum mechanics. It’s yet another example of how one can get lost in math when studying or teaching physics. ![]()
Original post:
In this post, I’ll try to explain how Riemann surfaces (or topological spaces in general) are transformed into compact spaces. Compact spaces are, in essence, closed and bounded subsets of some larger space. The larger space is unbounded – or ‘infinite’ if you want (the term ‘infinite’ is less precise – from a mathematical point of view at least).
I am sure you have all seen it: the Euclidean or complex plane gets wrapped around a sphere (the so-called Riemann sphere), and the Riemann surface of a square root function becomes a torus (i.e. a donut-like object). And then the donut becomes a coffee cup (yes: just type ‘donut and coffee cup’ and look at the animation). The sphere and the torus (and the coffee cup of course) are compact spaces indeed – as opposed to the infinite plane, or the infinite Riemann surface representing the domain of a (complex) square root function. But what does it all mean?
Let me, for clarity, start with a note on the symbols that I’ll be using in this post. I’ll use a boldface z for the complex number z = (x, y) = reiθ in this post (unlike what I did in my previous posts, in which I often used standard letters for complex numbers), or for any other complex number, such as w = u + iv. That’s because I want to reserve the non-boldface letter z for the (real) vertical z coordinate in the three-dimensional (Cartesian or Euclidean) coordinate space, i.e. R3. Likewise, non-boldface letters such as x, y or u and v, denote other real numbers. Note that I will also use a boldface R and a boldface C to denote the set of real numbers and the complex space respectively. That’s just because the WordPress editor has its limits and, among other things, it can’t do blackboard bold (i.e. these double struck symbols which you usually see as symbols for the set of real and complex numbers respectively). OK. Let’s go for it now.
In my previous post, I introduced the concept of a Riemann surface using the multivalued square root function w = z1/2 = √z. The square root function has only two values. If we write z as z = rei θ, then we can write these two values as w1 = √r ei(θ/2) and w2 = √r ei(θ/2 ± π). Now, √r ei(θ/2 ± π) is equal to √r ei(±π)ei(θ/2) = – √r ei(θ/2) and, hence, the second root is just the opposite of the first one, so w2 = – w1.
Introducing the concept of a Riemann surface using a ‘simple’ quadratic function may look easy enough but, in fact, this square root function is actually not the easiest one to start with. First, a simple single-valued function, such as w = 1/z (i.e. the function that is associated with the Riemann sphere) for example, would obviously make for a much easier point of departure. Secondly, the fact that we’re working with a limited number of values, as opposed to an infinite number of values (which is the case for the log z function for example) introduces this particularity of a surface turning back into itself which, as I pointed out in my previous post, makes the visualization of the surface somewhat tricky – to the extent it may actually prevent a good understanding of what’s actually going on.
Indeed, in the previous post I explained how the Riemann surface of the square root function can be visualized in the three-dimensional Euclidean space (i.e. R3). However, such representations only show the real part of z1/2, i.e. the vertical distance Re(z1/2) = √r cos(θ/2 + nπ), with n = 0 or ± 1. So these representations, like the one below for example, do not show the imaginary part, i.e. Im(z1/2) = √r sin(θ/2 + nπ) (n = 0, ± 1).
That’s both good and bad. It’s good because, in a graph like this, you want one point to represent one point only, and so you wouldn’t get that if you would superimpose the plot with the imaginary part of w = z1/2 on the plot showing the real part only. But it’s also bad, because one often forgets that we’re only seeing some part of the ‘real’ picture here, namely the real part, and so one often forgets to imagine the imaginary part. 🙂
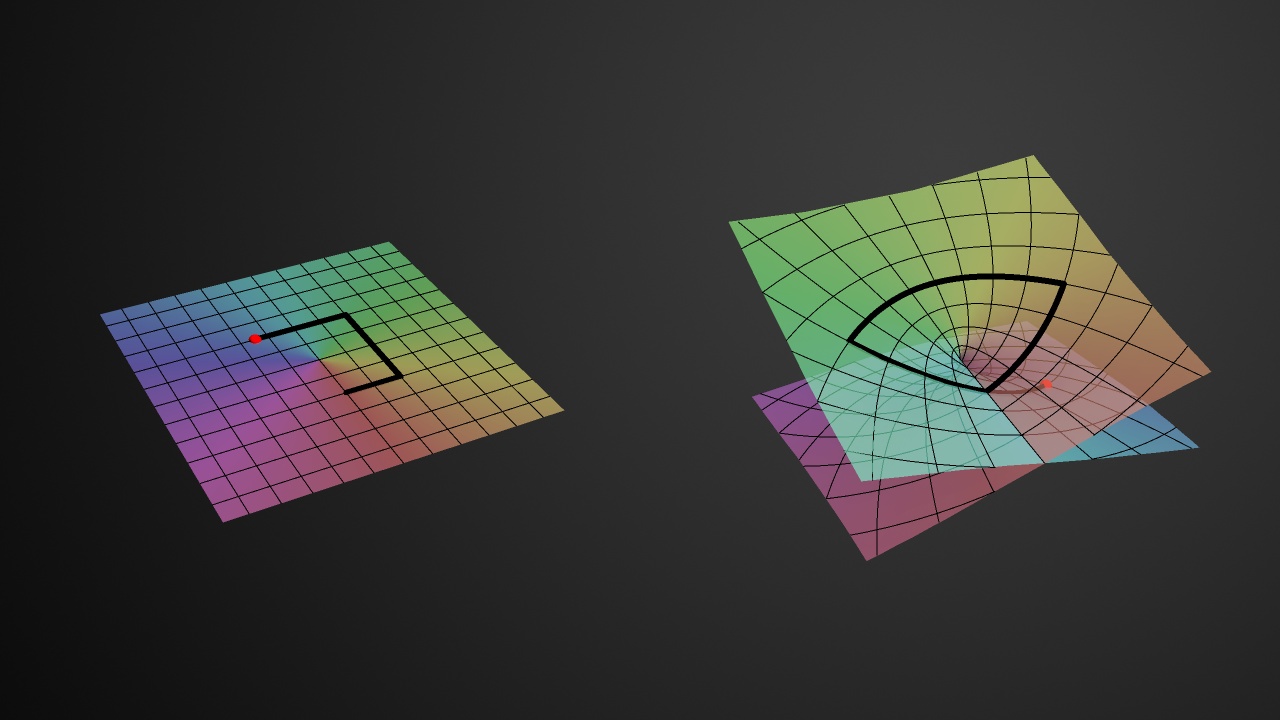
The thick black polygonal line in the two diagrams in the illustration above shows how, on this Riemann surface (or at least its real part), the argument θ of z = rei θ will go from 0 to 2π (and further), i.e. we’re making (more than) a full turn around the vertical axis, as the argument Θ of w = z1/2 = √reiΘ makes half a turn only (i.e. Θ goes from 0 to π only). That’s self-evident because Θ = θ/2. [The first diagram in the illustration above represents the (flat) w plane, while the second one is the Riemann surface of the square root function, so it represents z but so we have like two points for every z on the flat z plane: one for each root.]
All these visualizations of Riemann surfaces (and the projections on the z and w plane that come with them) have their limits, however. As mentioned in my previous post, one major drawback is that we cannot distinguish the two distinct roots for all of the complex numbers z on the negative real axis (i.e. all the points z = rei θ for which θ is equal to ±π, ±3π,…). Indeed, the real part of w = z1/2, i.e. Re(w), is equal to zero for both roots there, and so, when looking at the plot, you may get the impression that we get the same values for w there, so that the two distinct roots of z (i.e. w1 and w2) coincide. They don’t: the imaginary part of w1 and w2 is different there, so we need to look at the imaginary part of w too. Just to be clear on this: on the diagram above, it’s where the two sheets of the Riemann surface cross each other, so it’s like there’s an infinite number of branch points, which is not the case: the only branch point is the origin.
So we need to look at the imaginary part too. However, if we look at the imaginary part separately, we will have a similar problem on the positive real axis: the imaginary part of the two roots coincides there, i.e. Im(w) is zero, for both roots, for all the points z = rei θ for which θ = 0, 2π, 4π,… That’s what represented and written in the graph below.
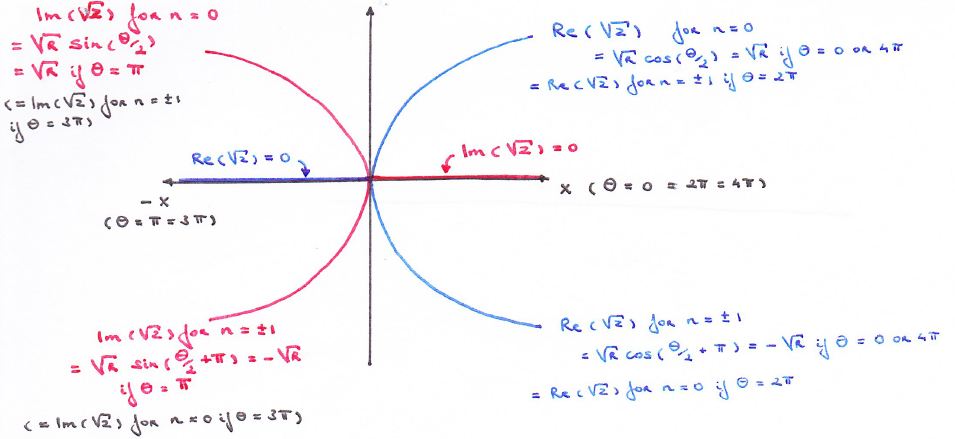
The graph above is a cross-section, so to say, of the Riemann surface w = z1/2 that is orthogonal to the z plane. So we’re looking at the x axis from -∞ to +∞ along the y axis so to say. The point at the center of this graph is the origin obviously, which is the branch point of our function w = z1/2, and so the y axis goes through it but we can’t see it because we’re looking along that axis (so the y-axis is perpendicular to the cross-section).
This graph is one I made as I tried to get some better understanding of what a ‘branch point’ actually is. Indeed, the graph makes it perfectly clear – I hope 🙂 – that we really have to choose between one of the two branches of the function when we’re at the origin, i.e. the branch point. Indeed, we can pick either the n = 0 branch or the n = ±1 branch of the function, and then we can go in any direction we want as we’re traveling on that Riemann surface, but so our initial choice has consequences: as Dr. Teleman (whom I’ll introduce later) puts it, “any choice of w, followed continuously around the origin, leads, automatically, to the opposite choice as we turn around it.” For example, if we take the w1 branch (or the ‘positive’ root as I call it – even if complex numbers cannot be grouped into ‘positive’ or ‘negative’ numbers), then we’ll encounter the negative root w2 after one loop around the origin. Well… Let me immediately qualify that statement: we will still be traveling on the w1 branch but so the value of w1 will be the opposite or negative value of our original w1 as we add 2π to arg z = θ. Mutatis mutandis, we’re in a similar situation if we’d take the w2 branch. Does that make sense?
Perhaps not, but I can’t explain it any better. In any case, the gist of the matter is that we can switch from the w1 branch to the w2 branch at the origin, and also note that we can only switch like that there, at the branch point itself: we can’t switch anywhere else. So there, at the branch point, we have some kind of ‘discontinuity’, in the sense that we have a genuine choice between two alternatives.
That’s, of course, linked to the fact that one cannot define the value of our function at the origin: 0 is not part of the domain of the (complex) square root function, or of the (complex) logarithmic function in general (remember that our square root function is just a special case of the log function) and, hence, the function is effectively not analytic there. So it’s like what I said about the Riemann surface for the log z function: at the origin, we can ‘take the elevator’ to any other level, so to say, instead of having to walk up and down that spiral ramp to get there. So we can add or subtract ± 2nπ to θ without any sweat.
So here it’s the same. However, because it’s the square root function, we’ll only see two buttons to choose from in that elevator, and our choice will determine whether we get out at level Θ = α (i.e. the w1 branch) or at level Θ = α ± π (i.e. the w2 branch). Of course, you can try to push both buttons at the same time but then I assume that the elevator will make some kind of random choice for you. 🙂 Also note that the elevator in the log z parking tower will probably have a numpad instead of buttons, because there’s infinitely many levels to choose from. 🙂
OK. Let’s stop joking. The idea I want to convey is that there’s a choice here. The choice made determines whether you’re going to be looking at the ‘positive’ roots of z, i.e. √r(cosΘ+i sinΘ) or at the ‘negative’ roots of z, i.e. √r(cos(Θ±π)+isin(Θ±π)), or, equivalently (because Θ = θ/2) if you’re going to be looking at the values of w for θ going from 0 to 2π, or the values of w for θ going from 2π to 4π.
Let’s try to imagine the full picture and think about how we could superimpose the graphs of both the real and imaginary part of w. The illustration below should help us to do so: the blue and red image should be shifted over and across each other until they overlap completely. [I am not doing it here because I’d have to make one surface transparent so you can see the other one behind – and that’s too much trouble now. In addition, it’s good mental exercise for you to imagine the full picture in your head.]
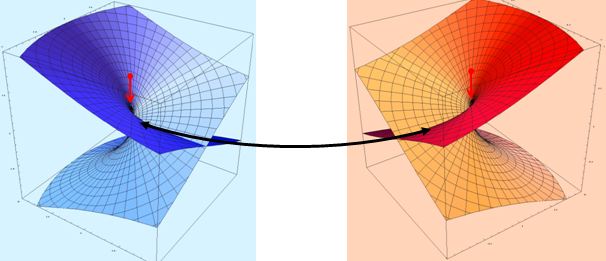
It is important to remember here that the origin of the complex z plane, in both images, is at the center of these cuboids (or ‘rectangular prisms’ if you prefer that term). So that’s what the little red arrow points is pointing at in both images and, hence, the final graph, consisting of the two superimposed surfaces (the imaginary and the real one), should also have one branch point only, i.e. at the origin.
[…]
I guess I am really boring my imaginary reader here by being so lengthy but so there’s a reason: when I first tried to imagine that ‘full picture’, I kept thinking there was some kind of problem along the whole x axis, instead of at the branch point only. Indeed, these two plots suggest that we have two or even four separate sheets here that are ‘joined at the hip’ so to say (or glued or welded or stitched together – whatever you want to call it) along the real axis (i.e. the x axis of the z plane). In such (erroneous) view, we’d have two sheets above the complex z plane (one representing the imaginary values of √z and one the real part) and two below it (again one with the values of the imaginary part of √z and one representing the values of the real part). All of these ‘sheets’ have a sharp fold on the x axis indeed (everywhere else they are smooth), and that’s where they join in this (erroneous) view of things.
Indeed, such thinking is stupid and leads nowhere: the real and imaginary parts should always be considered together, and so there’s no such thing as two or four sheets really: there is only one Riemann surface with two (overlapping) branches. You should also note that where these branches start or end is quite arbitrary, because we can pick any angle α to define the starting point of a branch. There is also only one branch point. So there is no ‘line’ separating the Riemann surface into two separate pieces. There is only that branch point at the origin, and there we decide what branch of the function we’re going to look at: the n = 0 branch (i.e. we consider arg w = Θ to be equal to θ/2) or the n = ±1 branch (i.e. we take the Θ = θ/2 ± π equation to calculate the values for w = z1/2).
OK. Enough of these visualizations which, as I told you above already, are helpful only to some extent. Is there any other way of approaching the topic?
Of course there is. When trying to understand these Riemann surfaces (which is not easy when you read Penrose because he immediately jumps to Riemann surfaces involving three or more branch points, which makes things a lot more complicated), I found it useful to look for a more formal mathematical definition of a Riemann surface. I found such more formal definition in a series of lectures of a certain Dr. C. Teleman (Berkeley, Lectures on Riemann surfaces, 2003). He defines them as graphs too, or surfaces indeed, just like Penrose and others, but, in contrast, he makes it very clear, right from the outset, that it’s really the association (i.e. the relation) between z and w which counts, not these rather silly attempts to plot all these surfaces in three-dimensional space.
Indeed, according to Dr. Teleman’s introduction to the topic, a Riemann surface S is, quite simply, a set of ‘points’ (z, w) in the two-dimensional complex space C2 = C x C (so they’re not your typical points in the complex plane but points with two complex dimensions), such that w and z are related with each other by a holomorphic function w = f(z), which itself defines the Riemann surface. The same author also usefully points out that this holomorphic function is usually written in its implicit form, i.e. as P(z, w) = 0 (in case of a polynomial function) or, more generally, as F(z, w) = 0.
There are two things you should note here. The first one is that this eminent professor suggests that we should not waste too much time by trying to visualize things in the three-dimensional R3 = R x R x R space: Riemann surfaces are complex manifolds and so we should tackle them in their own space, i.e. the complex C2 space. The second thing is linked to the first: we should get away from these visualizations, because these Riemann surfaces are usually much and much more complicated than a simple (complex) square root function and, hence, are usually not easy to deal with. That’s quite evident when we consider the general form of the complex-analytical (polynomial) P(z, w) function above, which is P(z, w) = wn + pn-1(z)wn-1 + … + p1(z)w + p0(z), with the pk(z) coefficients here being polynomials in z themselves.
That being said, Dr. Teleman immediately gives a ‘very simple’ example of such function himself, namely w = [(z2 – 1) + ((z2 – k2)]1/2. Huh? If that’s regarded as ‘very simple’, you may wonder what follows. Well, just look him up I’d say: I only read the first lecture and so there are fourteen more. 🙂
But he’s actually right: this function is not very difficult. In essence, we’ve got our square root function here again (because of the 1/2 exponent), but with four branch points this time, namely ± 1 and ± k (i.e. the positive and negative square roots of 1 and k2 respectively, cf. the (z2 – 1) and (z2 – k2) terms in the argument of this function), instead of only one (the origin).
Despite the ‘simplicity’ of this function, Dr. Teleman notes that “we cannot identify this shape by projection (or in any other way) with the z-plane or the w-plane”, which confirms the above: Riemann surfaces are usually not simple and, hence, these ‘visualizations’ don’t help all that much. However, while not ‘identifying the shape’ of this particular square root function, Dr. Teleman does make the following drawing of the branch points:
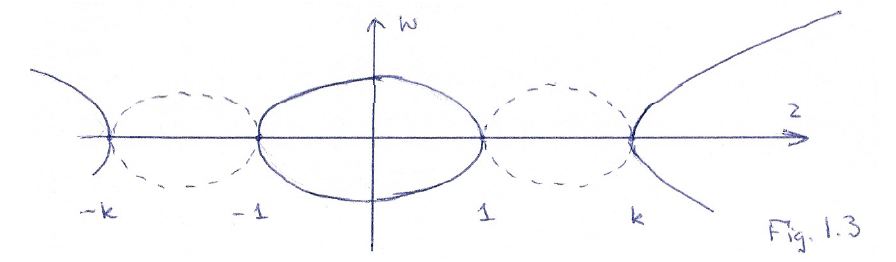
This is also some kind of cross-section of the Riemann surface, just like the one I made above for the ‘super-simple’ w = √z function: the dotted lines represent the imaginary part of w = [(z2 – 1) + (z2 – k2)]1/2, and the non-dotted lines are the real part of the (double-valued) w function. So that’s like ‘my’ graph indeed, except that we’ve got four branch points here, so we can make a choice between one of the two branches of w at each of them.
[Note that one obvious difficulty in the interpretation of Dr. Teleman’s little graph above is that we should not assume that the complex numbers k and –k are actually lying on the same line as 1 and -1 (i.e. the real line). Indeed, k and –k are just standard complex numbers and most complex numbers do not lie on the real line. While that makes the interpretation of that simple graph of Dr. Teleman somewhat tricky, it’s probably less misleading than all these fancy 3D graphs. In order to proceed, we can either assume that this z axis is some polygonal line really, representing line segments between these four branch points or, even better, I think we should just accept the fact we’re looking at the z plane here along the z plane itself, so we can only see it as a line and we shouldn’t bother about where these points k and –k are located. In fact, their absolute value may actually be smaller than 1, in which case we’d probably want to change the order of the branch points in Dr. Teleman’s little graph).]
Dr. Teleman doesn’t dwell too long on this graph and, just like Penrose, immediately proceeds to what’s referred to as the compactification of the Riemann space, so that’s this ‘transformation’ of this complex surface into a donut (or a torus as it’s called in mathematics). So how does one actually go about that?
Well… Dr. Teleman doesn’t waste too many words on that. In fact, he’s quite cryptic, although he actually does provide much more of an explanation than Penrose does (Penrose’s treatment of the matter is really hocus-pocus I feel). So let me start with a small introduction of my own once again.
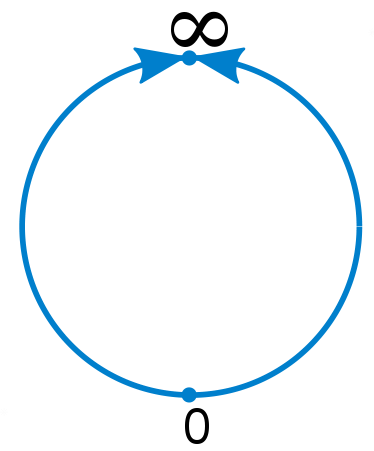
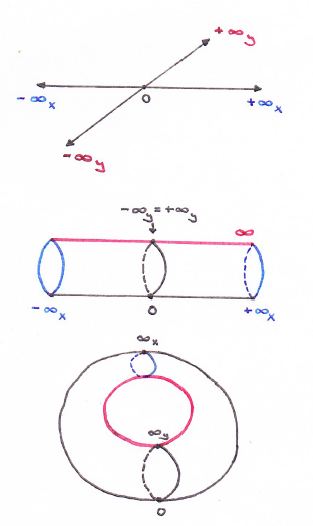
I guess it all starts with the ‘compactification’ of the real line, which is visualized below: we reduce the notion of infinity to a ‘point’ (this ‘point’ is represented by the symbol ∞ without a plus or minus sign) that bridges the two ‘ends’ of the real line (i.e. the positive and negative real half-line). Like that, we can roll up single lines and, by extension, the whole complex plane (just imagine rolling up the infinite number of lines that make up the plane I’d say :-)). So then we’ve got an infinitely long cylinder.
But why would we want to roll up a line, or the whole plane for that matter? Well… I don’t know, but I assume there are some good reasons out there: perhaps we actually do have some thing going round and round, and so then it’s probably better to transform our ‘real line’ domain into a ‘real circle’ domain. The illustration below shows how it works for a finite sheet, and I’d also recommend my imaginary reader to have a look at the Riemann Project website (http://science.larouchepac.com/riemann/page/23), where you’ll find some nice animations (but do download Wolfram’s browser plugin if your Internet connection is slow: downloading the video takes time). One of the animations shows how a torus is, indeed, ideally suited as a space for a phenomenon characterized by two “independent types of periodicity”, not unlike the cylinder, which is the ‘natural space’ for “motion marked by a single periodicity”.
However, as I explain in a note below this post, the more natural way to roll or wrap up a sheet or a plane is to wrap it around a sphere, rather than trying to create a donut. Indeed, if we’d roll the infinite plane up in a donut, we’ll still have a line representing infinity (see below) and so it looks quite ugly: if you’re tying ends up, it’s better you tie all of them up, and so that’s what you do when you’d wrap the plane up around a sphere, instead of a torus.
OK. Enough on planes. Back to our Riemann surface. Because the square root function w has two values for each z, we cannot make a simple sphere: we have to make a torus. That’s because a sphere has one complex dimension only, just like a plane, and, hence, they are topologically equivalent so to say. In contrast, a double-valued function has two ‘dimensions’ so to say and, hence, we have to transform the Riemann surface into something which accommodates that, and so that’s a torus (or a coffee cup :-)). In topological jargon, a torus has genus one, while the complex plane (and the Riemann sphere) has genus zero.
[Please do note that this will be the case regardless of the number of branch points. Indeed, Penrose gives the example of the function w = (1 – z3)1/2, which has three branch points, namely the three cube roots of the 1 – z3 expression (these three roots are obviously equal to the three cube roots of unity). However, ‘his’ Riemann surface is also a Riemann surface of a square root function (albeit one with a more complicated form than the ‘core’ w = z1/2 example) and, hence, he also wraps it up as a donut indeed, instead of a sphere or something else.]
I guess that you, my imaginary reader, have stopped reading all of this nonsense. If you haven’t, you’re probably thinking: why don’t we just do it? How does it work? What’s the secret?
Frankly, the illustration in Penrose’s Road to Reality (i.e. Fig. 8.2 on p. 137) is totally useless in terms of understanding how it’s being done really. In contrast, Dr. Teleman is somewhat more explicit and so I’ll follow him here as much as I can while I try to make sense of it (which is not as easy as you might think).
The short story is the following: Dr. Teleman first makes two ‘cuts’ (or ‘slits’) in the z plane, using the four branch points as the points where these ‘cuts’ start and end. He then uses these cuts to form two cylinders, and then he joins the ends of these cylinders to form that torus. That’s it. The drawings below illustrate the proceedings.


Huh? OK. You’re right: the short story is not correct. Let’s go for the full story. In order to be fair to Dr. Teleman, I will literally copy all what he writes on what is illustrated above, and add my personal comments and interpretations in square brackets (so when you see those square brackets, that’s [me] :-)). So this is what Dr. Teleman has to say about it:
The function w = [(z2 – 1) + ((z2 – k2)]1/2 behaves like the [simple] square root [function] near ± 1 and ± k. The important thing is that there is no continuous single-valued choice of w near these points [shouldn’t he say ‘on’ these points, instead of ‘near’?]: any choice of w, followed continuously round any of the four points, leads to the opposite choice upon return.
[The formulation may sound a bit weird, but it’s the same as what happens on the simple w = z1/2 surface: when we’re on one of the two branches, the argument of w changes only gradually and, going around the origin, starting from one root of z (let’s say the ‘positive’ root w1), we arrive, after one full loop around the origin on the z plane (i.e. we add 2π to arg z = θ), at the opposite value, i.e. the ‘negative’ root w2 = -w1.]
Defining a continuous branch for the function necessitates some cuts. The simplest way is to remove the open line segments joining 1 with k and -1 with –k. On the complement of these segments [read: everywhere else on the z plane], we can make a continuous choice of w, which gives an analytic function (for z ≠ ±1, ±k). The other branch of the graph is obtained by a global change of sign. [Yes. That’s obvious: the two roots are each other’s opposite (w2 = –w1) and so, yes, the two branches are, quite simply, just each other’s opposite.]
Thus, ignoring the cut intervals for a moment, the graph of w breaks up into two pieces, each of which can be identified, via projection, with the z-plane minus two intervals (see Fig. 1.4 above). [These ‘projections’ are part and parcel of this transformation business it seems. I’ve encountered more of that stuff and so, yes, I am following you, Dr. Teleman!]
Now, over the said intervals [i.e. between the branch points], the function also takes two values, except at the endpoints where those coincide. [That’s true: even if the real parts of the two roots are the same (like on the negative real axis for our w = z1/2 s), the imaginary parts are different and, hence, the roots are different for points between the various branch points, and vice versa of course. This is actually one of the reasons why I don’t like Penrose’s illustration on this matter: his illustration suggests that this is not the case.]
To understand how to assemble the two branches of the graph, recall that the value of w jumps to its negative as we cross the cuts. [At first, I did not get this, but so it’s the consequence of Dr. Teleman ‘breaking up the graph into tow pieces’. So he separates the two branches indeed, and he does so at the ‘slits’ he made, so that’s between the branch points. It follows that the value of w will indeed jump to its opposite value as we cross them, because we’re jumping on the other branch there.]
Thus, if we start on the upper sheet and travel that route, we find ourselves exiting on the lower sheet. [That’s the little arrows on these cuts.] Thus, (a) the far edges of the cuts on the top sheet must be identified with the near edges of the cuts on the lower sheet; (b) the near edges of the cuts on the top sheet must be identified with the far edges on the lower sheet; (c) matching endpoints are identified; (d) there are no other identifications. [Point (d) seems to be somewhat silly but I get it: here he’s just saying that we can’t do whatever we want: if we glue or stitch or weld all of these patches of space together (or should I say copies of patches of space?), we need to make sure that the points on the edges of these patches are the same indeed.]
A moment’s thought will convince us that we cannot do all this in in R3, with the sheets positioned as depicted, without introducing spurious crossings. [That’s why Brown and Churchill say it’s ‘physically impossible.’] To rescue something, we flip the bottom sheet about the real axis.
[Wow! So that’s the trick! That’s the secret – or at least one of them! Flipping the sheet means rotating it by 180 degrees, or multiplying all points twice with i, so that’s i2 = -1 and so then you get the opposite values. Now that’s a smart move!]
The matching edges of the cuts are now aligned, and we can perform the identifications by stretching each of the surfaces around the cut to pull out a tube. We obtain a picture representing two planes (ignore the boundaries) joined by two tubes (see Fig. 1.5.a above).
[Hey! That’s like the donut-to-coffee-cup animation, isn’t it? Pulling out a tube? Does that preserve angles and all that? Remember it should!]
For another look at this surface, recall that the function z → R2/z identifies the exterior of the circle ¦z¦ < R with the punctured disc z: ¦z¦ < R and z ≠ 0 (it’s a punctured disc so its center is not part of the disc). Using that, we can pull the exteriors of the discs, missing from the picture above, into the picture as punctured discs, and obtain a torus with two missing points as the definitive form of our Riemann surface (see Fig. 1.5.b).
[Dr. Teleman is doing another hocus-pocus thing here. So we have those tubes with an infinite plane hanging on them, and so it’s obvious we just can’t glue these two infinite planes together because it wouldn’t look like a donut 🙂. So we first need to transform them into something more manageable, and so that’s the punctured discs he’s describing. I must admit I don’t quite follow him here, but I can sort of sense – a little bit at least – what’s going on.]
[…]
Phew! Yeah, I know. My imaginary reader will surely feel that I don’t have a clue of what’s going on, and that I am actually not quite ready for all of this high-brow stuff – or not yet at least. He or she is right: my understanding of it all is rather superficial at the moment and, frankly, I wish either Penrose or Teleman would explain this compactification thing somewhat better. I also would like them to explain why we actually need to do this compactification thing, why it’s relevant for the real world.
Well… I guess I can only try to move forward as good as I can. I’ll keep you/myself posted.
Note: As mentioned above, there is more than one way to roll or wrap up the complex plane, and the most natural way of doing this is to do it around a sphere, i.e. the so-called Riemann sphere, which is illustrated below. This particular ‘compactification’ exercise is equivalent to a so-called stereographic projection: it establishes a one-on-one relationship between all points on the sphere and all points of the so-called extended complex plane, which is the complex plane plus the ‘point’ at infinity (see my explanation on the ‘compactification’ of the real line above).
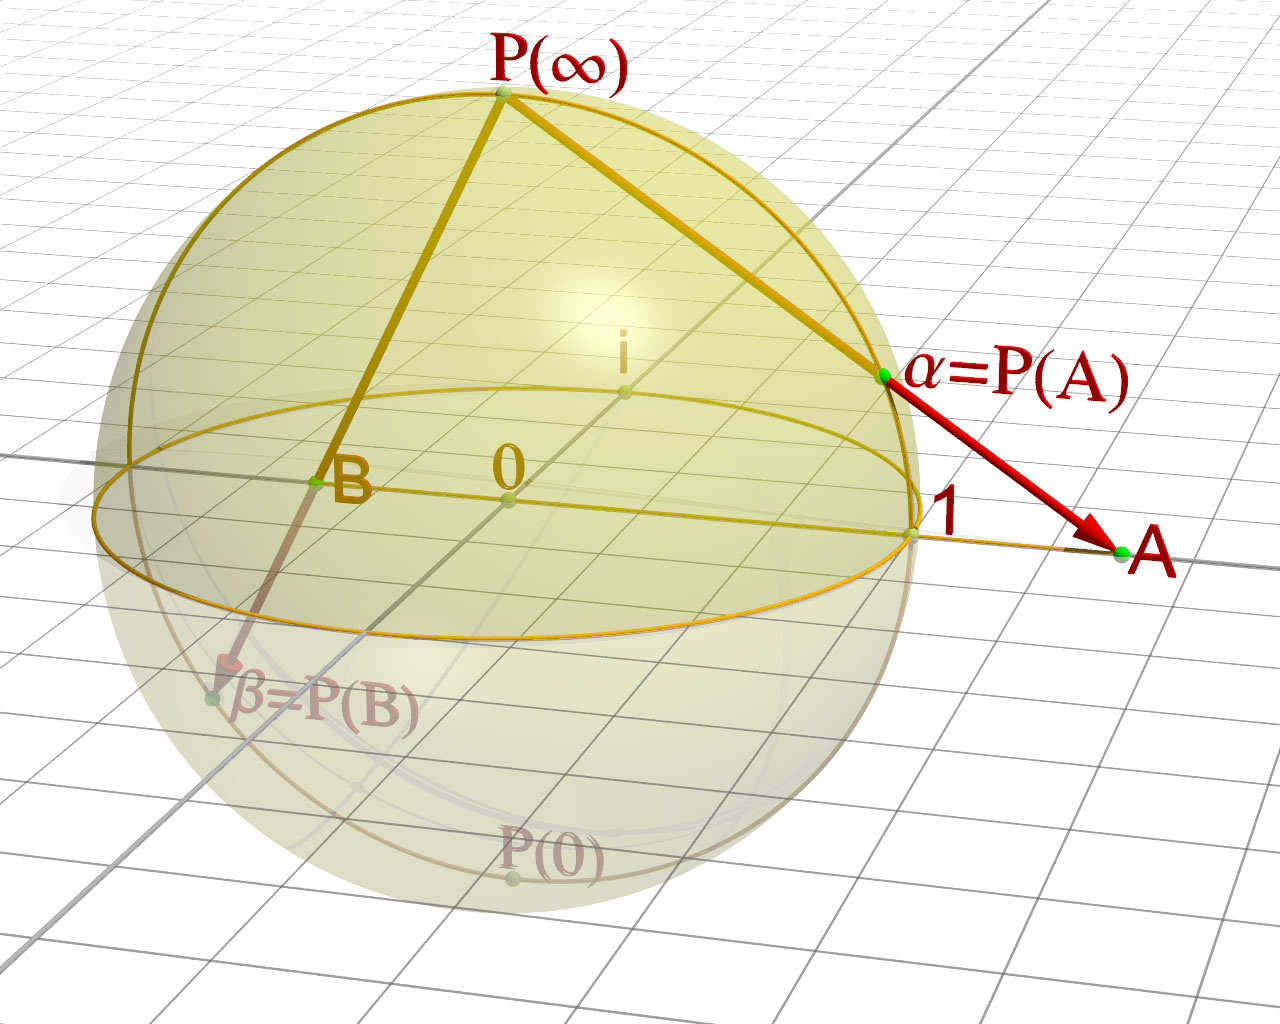

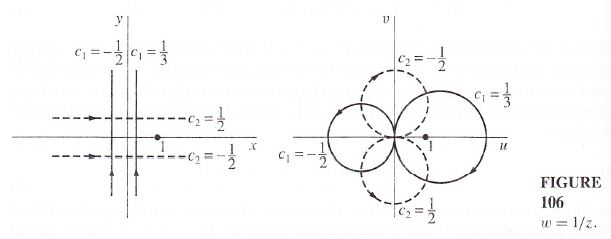
But so Riemann surfaces are associated with complex-analytic functions, right? So what’s the function? Well… The function with which the Riemann sphere is associated is w = 1/z. [1/z is equal to z = z*/¦z¦2 , with z* = x – iy, i.e. the complex conjugate of z = x + iy, and ¦z¦ the modulus or absolute value of z, and so you’ll recognize the formulas for the stereographic projection here indeed.]
OK. So what? Well… Nothing much. This mapping from the complex z plane to the complex w plane is conformal indeed, i.e. it preserves angles (but not areas) and whatever else that comes with complex analyticity. However, it’s not as straightforward as Penrose suggests. The image below (taken from Brown and Churchill) shows what happens to lines parallel to the x and y axis in the z plane respectively: they become circles in the w plane. So this particular function actually does map circles to circles (which is what holomorphic functions have to do) but only if we think of straight lines as being particular cases of circles, namely circles “of infinite radius”, as Penrose puts it.
Frankly, it is quite amazing what Penrose expects in terms of mental ‘agility’ of the reader. Brown and Churchill are much more formal in their approach (lots of symbols and equations I mean, and lots of mathematical proofs) but, to be honest, I find their stuff easier to read, even if their textbook is a full-blown graduate level course in complex analysis.
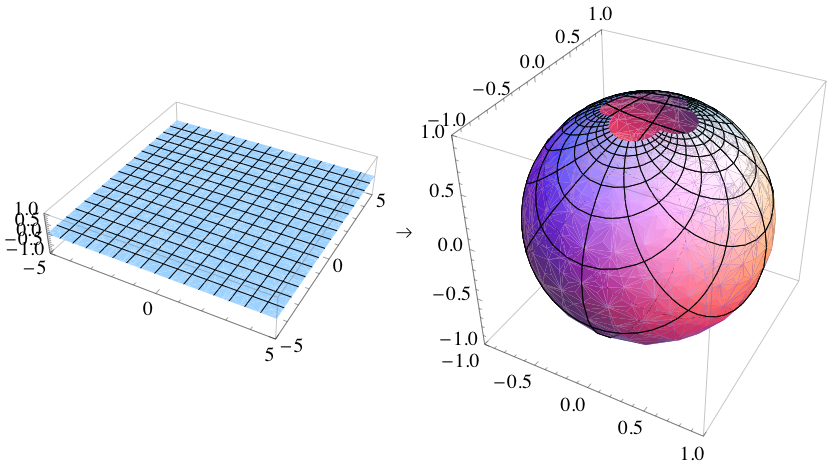
I’ll conclude this post here with two more graphs: they give an idea of how the Cartesian and polar coordinate spaces can be mapped to the Riemann sphere. In both cases, the grid on the plane appears distorted on the sphere: the grid lines are still perpendicular, but the areas of the grid squares shrink as they approach the ‘north pole’.

The mathematical equations for the stereographic projection, and the illustration above, suggest that the w = 1/z function is basically just another way to transform one coordinate system into another. But then I must admit there is a lot of finer print that I don’t understand – as yet that is. It’s sad that Penrose doesn’t help out very much here.

2 thoughts on “Compactifying complex spaces”